|
Contributors
Latest Posts Show All Recent Posts Archive
Tags Everything |

|
Contributors
Latest Posts Show All Recent Posts Archive
Tags Everything |
To contact a Direction representative, please click the button below:

Welcome to another Printing 101 blog entry - Holding it all Together – Bindery Basics
Ever wonder what the best way to bind your project is? There are several different options and it really depends on the type of project/preference and the page count. Here is a breakdown of the most common types of bindery for easy reference and comparison.

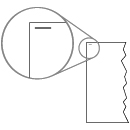
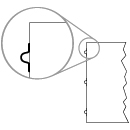
Saddle Stitching (Stapling) – This is where there are 2 staples put through the stock to hold pages together (sometimes 3, if needed). Great for lower qty page count projects.
Pro’s: Inexpensive and fast to produce, project lays relatively flat when open to a page (not so much for higher page counts), adds minimal weight so especially good for mailing, easy to insert into envelopes
Con’s: Limited page count
Detailed Spec’s: Minimum 8 pages up to 76-80 pages based on 80lb text weight (increments of 4 pages needed for this bindery type). The max. page count is based on best performance - Add’l pages are also possible, but they cause spine creep (see previous blog entry) and the force of the stitching can sometimes create issues of strain on the cover and the center panels.
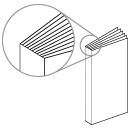
Perfect Bindery – This is essentially where all your pages are glued together along with a cover that creates a spine for your project.
Pro’s: Can accommodate a lot of pages and creates a very professional finished look, easy to insert into envelopes, spine allows for design/text when on a shelf
Con’s: Takes a bit of extra time to produce (1-3 days), projects do not lay flat when open to a page
Detailed Spec’s: Minimum 48-52 pages up to 310-330 pages based on 80lb text weight (increments of 2 pages okay for this bindery type). There is standard glue available for shorter term catalogues and a PUR glue, which is much stronger for longer term use catalogues to help insure the pages don’t fall out easily with repeated use.
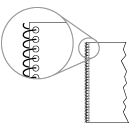
Plastic Coil (Plastikoil) Bindery – This is where a series of holes are punched through collated sheets and then a plastic coil is threaded throughout them and bent on the edges to close up bindery. Available in many colours
Pro’s: Can accommodate a lot of pages, colourful options available, project lays flat when open to a page
Con’s: Takes a bit of extra time to produce (1-3 days, depending on qty)
Detailed Spec’s: Minimum 20 pages up to 290-310 pages based on 80lb text weight (increments of 2 pages okay for this bindery type). Standard colours are black and white, but there lots of other colours are available (some are special order). A bonus is that this bindery type could be opened up if typos are found on a page so that it can be swapped out (vs. having to reprint the whole project.)
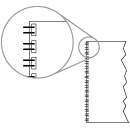
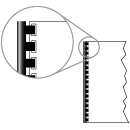
Double Loop Wire (Wire-o) Bindery – This is also a method where a series of holes are punched into collated pages and then a metal double loop wire is put in and then pressure closed (squeezed).
Pro’s: Can accommodate a lot of pages, project lays flat when open to a page,
Con’s: Takes a bit of extra time to produce (1-3 days, depending on qty)
Detailed Spec’s: Minimum 20 pages up to 240-260 pages based on 80lb text weight (increments of 2 pages okay for this bindery type). Black and dull gunmetal or gloss metal are standard. Other colours available, but will be special order. As with plastic coil, this bindery type could be opened up if typos are found on a page so that it can be swapped out (vs. having to reprint the whole project.)
Here are some add’l types of bindery available:
Corner Stitching (stapled corner) – This is just as it sounds, a staple put into the top corner of a project to hold the pages together. Some projects are done this way for economy or simplicity.
Case binding (hardcover) – This is for high-end books or catalogues meant to be kept around for a long-term use. Expensive when compared to other options.
Loop stitching – This is sort of a version of saddle stitching that is designed to include a handy loop so that you can put your project into a standard binder (vs. having to do 3-hole drilling).
Plastic Comb (Cerlox) – While similar to double loop wire (Wire-o) this type of inexpensive binding is most common in copy shops or educational institutions. Simple to be put together but tends to come apart after a lot of use (as it’s just tension on the loop of plastic and nothing is permanently attached).
Feel free to contact us if you’d like to know more about different bindery options and what might work best for your project. We’d be more than happy to provide a sample for your review as well!
|
|
|
|
|
|